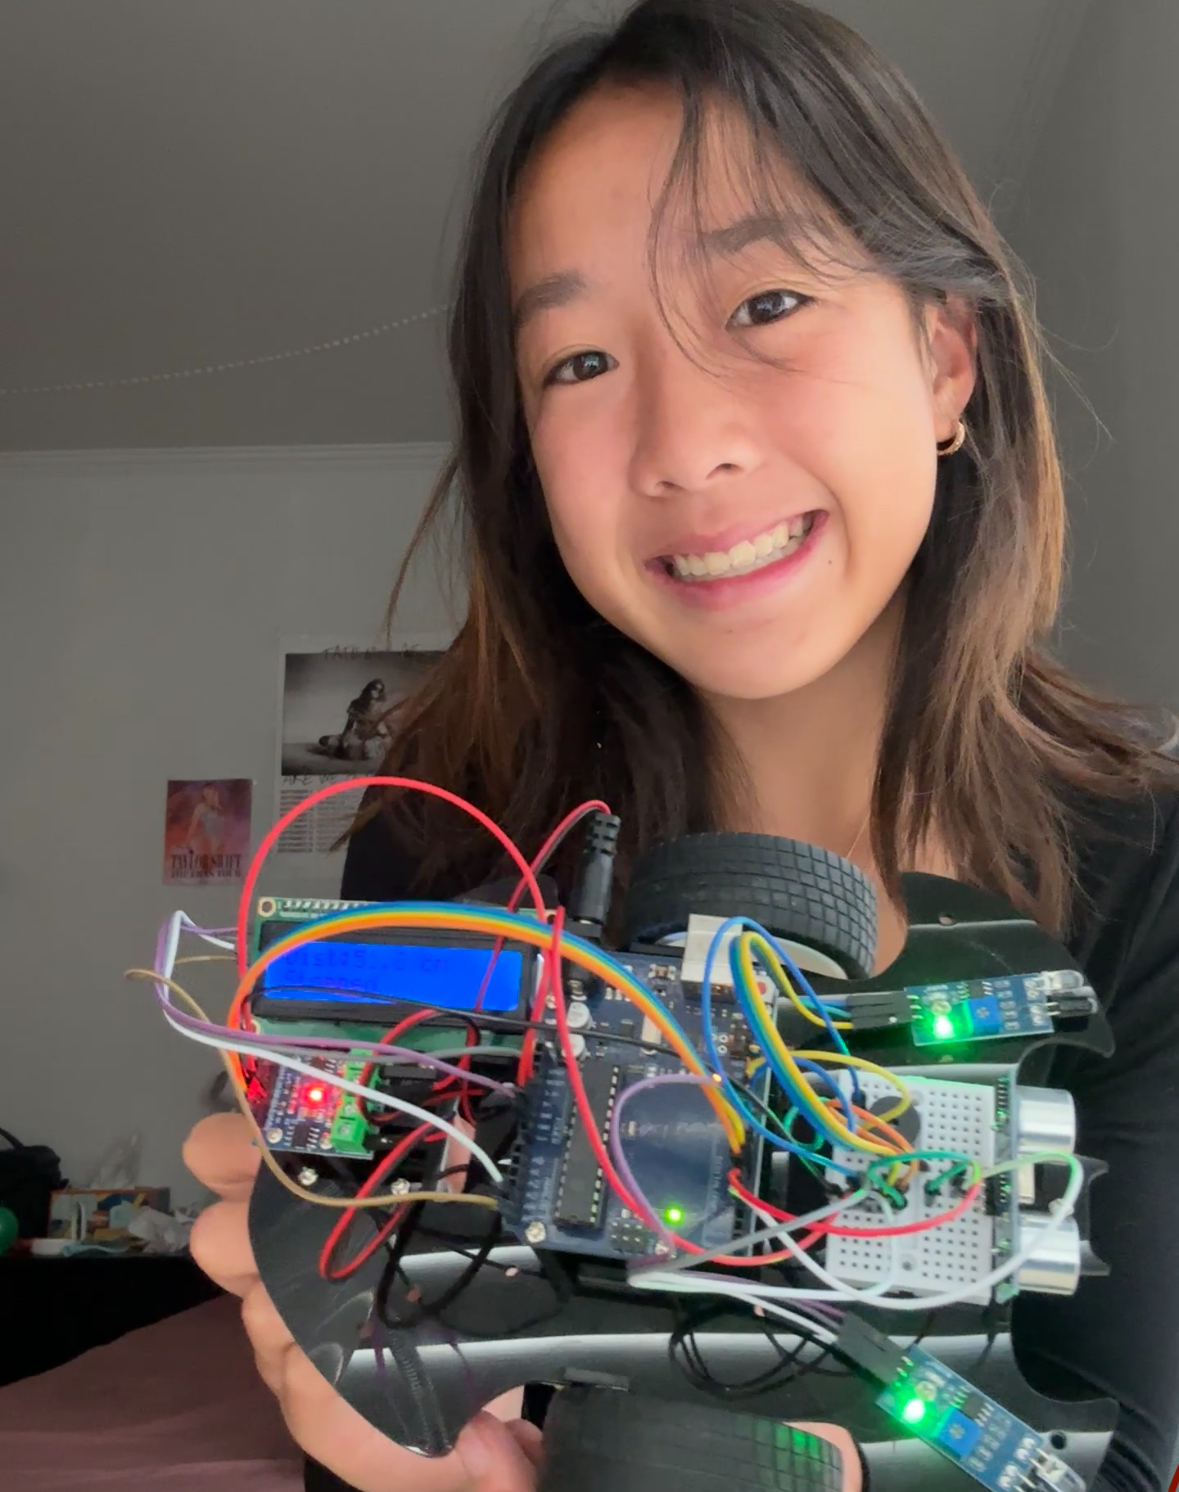
Human Following Robot
This robot is designed to follow objects, avoid obstacles, and display distance data while playing background music. At the core of the robot is an Arduino that reads multiple sensors, controls two DC motors, updates an LCD screen, and runs a non-blocking melody—all through a piezo buzzer at the same time. Using a combination of ultrasonic and infrared sensors, the robot follows objects placed in front of it and responds to walls or hands approaching from the sides.
| Engineer | School | Area of Interest | Grade |
|---|---|---|---|
| Hebe S. | Galileo Academy of Science and Technology | Chemical Engineering | Incoming Senior |
Modification
For my modification, I integrated three key systems into a platform: an ultrasonic distance follower, dual infrared side-sensing obstacle avoidance, and a non-blocking music playback system. I programmed the robot so it can smoothly follow objects 5–15 cm in front of it, stop automatically when something is too close, avoid obstacles on the sides, and display its status on an LCD screen—all while playing music in the background.
Technical Progress
Current Build
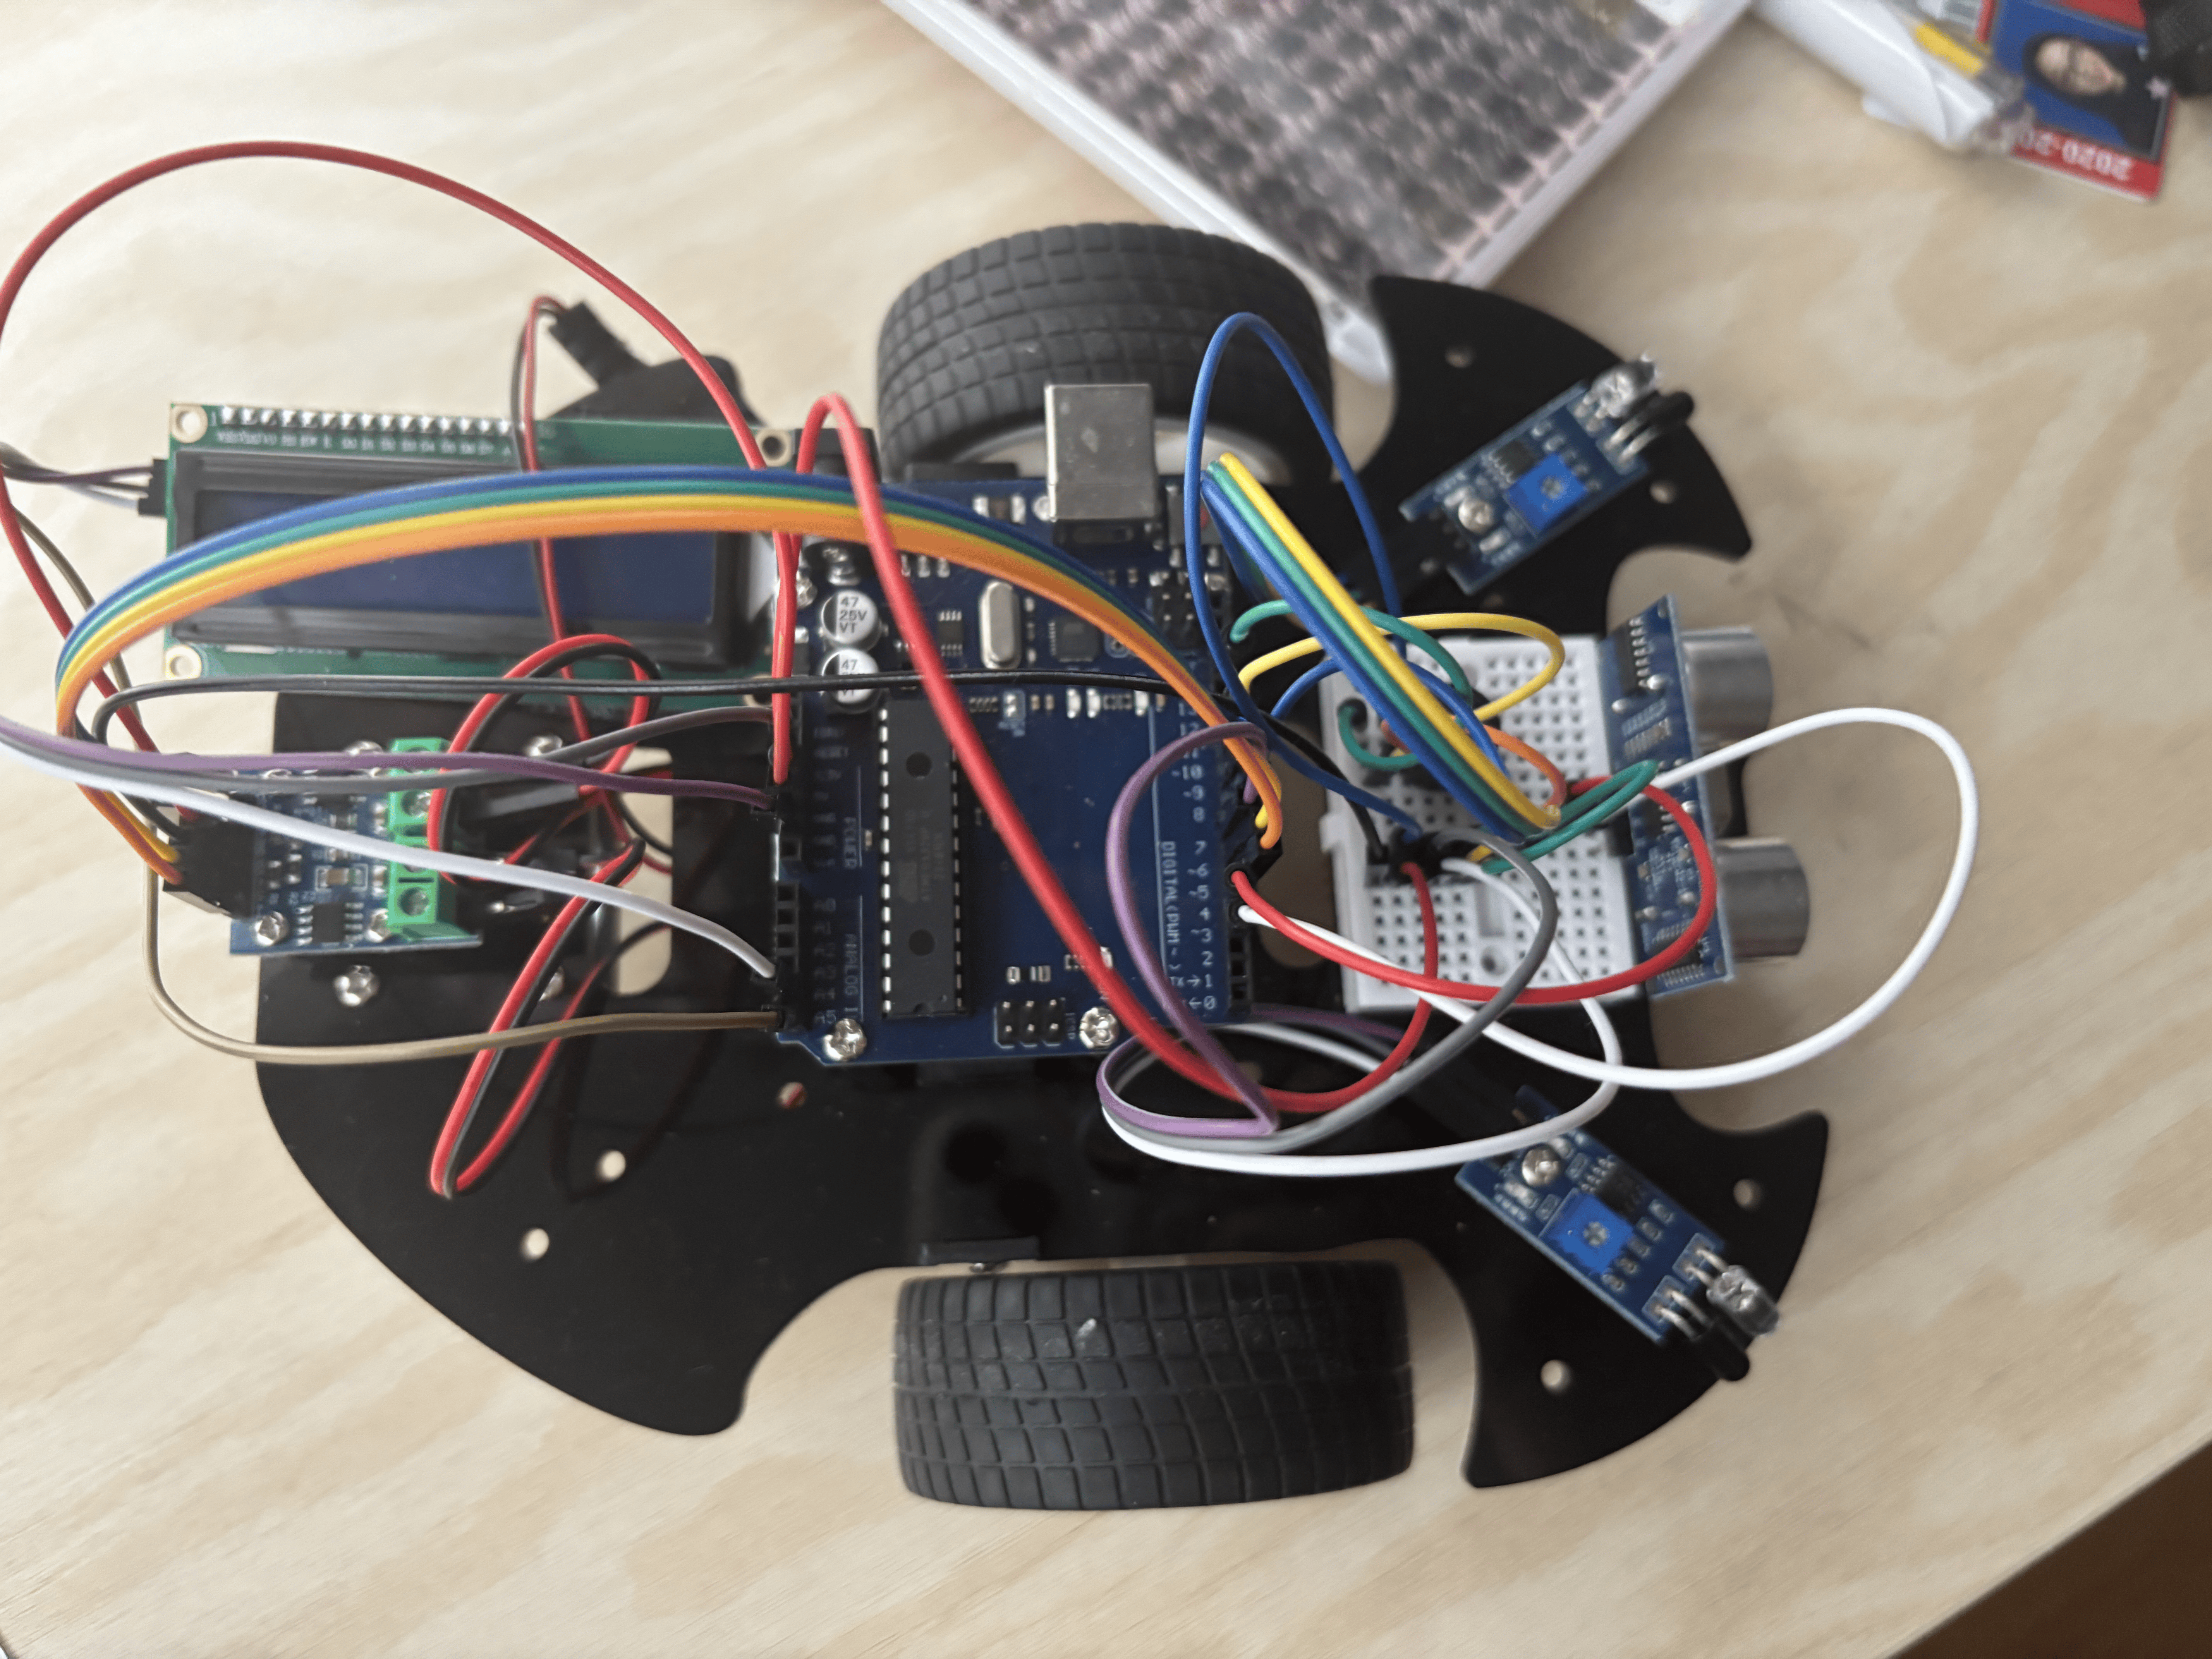
The robot currently consists of:
- Arduino microcontroller
- Two DC motors
- L9110 H-bridge motor driver
- Ultrasonic sensor
- Two IR sensors
- 16×2 I2C LCD
- Buzzer (pin 11)
Core System – The Arduino
The Arduino acts as the brain of the robot:
- Reads sensor data from ultrasonic and IR sensors
- Makes movement decisions
- Sends signals to motors, LCD, and buzzer
Ultrasonic Sensor: Mounted at the front, connected to trigPin and echoPin
IR Sensors: One on each side to detect obstacles
Sensor Logic & Behavior
Ultrasonic Following Mode:
- Follow objects at 5–15 cm
- Stop if too close (<5 cm)
IR Avoidance Mode:
- Activate when no object in front
- Detect walls or hands
- Turn away from detected obstacles
Motor Control
- Two DC motors connected to the motor driver
- Controlled via
analogWrite()and PWM - Smooth turns by slowing one motor while keeping the other running
LCD & Buzzer
LCD: 16×2 I2C display shows real-time status (Moving Forward, Turning, Stopping)
Buzzer: Plays melodies using non-blocking code (millis()), so movement and sensors continue uninterrupted
Challenges
-
Component integration: Switching from
delay()tomillis()allowed simultaneous movement, music, and sensor readings: I struggled with getting the robot to play the music and move simultaneously. This is becausedelay()pauses the entire program, which stops the motors and prevents sensors from being read. By usingmillis(), I was able to track elapsed time without stopping the program and allow the robot to continuously read sensor data, update motor movement, and play music. -
Wiring management: Pin conflicts: I spent a lot of time double-checking connections, organizing wires, and troubleshooting when things didn’t behave as expected. It taught me the importance of both clean wiring and systematic debugging.
Final Milestone
For my final milestone, I successfully combined all mechanical, electrical, and software components into one system. The robot can now:
- Follow objects with the ultrasonic sensor
- Avoid side obstacles with the IR sensors
- Display its state on the LCD
- Drive two motors smoothly
- Play music using non-blocking code through Piezzo Buzzer
To me, seeing all the parts working together in real time felt incredibly rewarding.
Second Milestone
For my second milestone, I wired and integrated the robot’s sensing and feedback systems. I connected the ultrasonic sensor (HC-SR04) to the Arduino’s trigPin and echoPin, mounting it at the front of the robot to detect objects directly ahead. Then, I added two IR obstacle sensors: one on the left and one on the right, to detect walls or barriers that the ultrasonic sensor might not catch.
Starting on my modification, I installed a 16×2 I2C LCD, which only uses the SDA and SCL lines. The purpose of this is to display real-time data for the user as the robot moves. This allowed me to keep my wiring clean while allowing me to display status messages such as “Moving Forward,” “Turning Left,” and “Too Close: Stop.” I also programmed the robot so that if no object is detected within the 5–15 cm following range, it automatically switches to IR-based avoidance mode and turns away from obstacles picked up by the side sensors.
The most difficult part of this milestone was managing the wiring and ensuring all my pins were correctly assigned. Pin conflicts caused several frustrating bugs and took time to debug, but fixing them helped me understand how important consistent wiring is.
For my next milestone, I plan to incorporate a piezo buzzer so the robot can play music while it moves, using non-blocking code so it won’t interrupt sensor behavior.
First Milestone
For my first milestone, I used components provided to me by the SunFounder Kit, such as the Arduino microcontroller, distance-measuring ultrasonic sensors, infrared sensors to detect obstacles, motor drivers, and DC motors for making movement, to build the foundation of my robot.
The Arduino is the core aspect of my project. It reads sensor data, makes decisions, and sends data points out to the other components of the robot. The Arduino is the one that records data points to send them to the motor driver, allowing the robot to move using two DC motors, which are connected to motor driver pins on the Arduino. By using analogWrite() to send PWM signals, the Arduino can adjust motor speed and direction. For example, if the robot needs to turn, it slows down one motor while keeping the other running, which creates a smooth curve instead of a sharp pivot.
During this project, I’ve also added 2 infrared (IR) sensors, one to the left and one to the right of the robot, and an ultrasonic sensor mounted at the front. The IR sensors detect reflected light to tell you where the object is, while the ultrasonic sensors use sound waves to measure the distance of the object. These components work together by having the sensors receive environmental information, which the Arduino calculates to send signals to the motors to move forward, backward, or turn whenever needed.
At this stage, I assembled the robot’s hardware, connected all sensors and motors, and started programming basic movement in C++. So far, I have successfully programmed the robot to move forward and backward based on sensor readings and to detect nearby objects and turn toward them. My biggest challenges have included processing sensor data reliably and debugging wiring issues—both of which were time-consuming but taught me a lot about hardware-software integration.
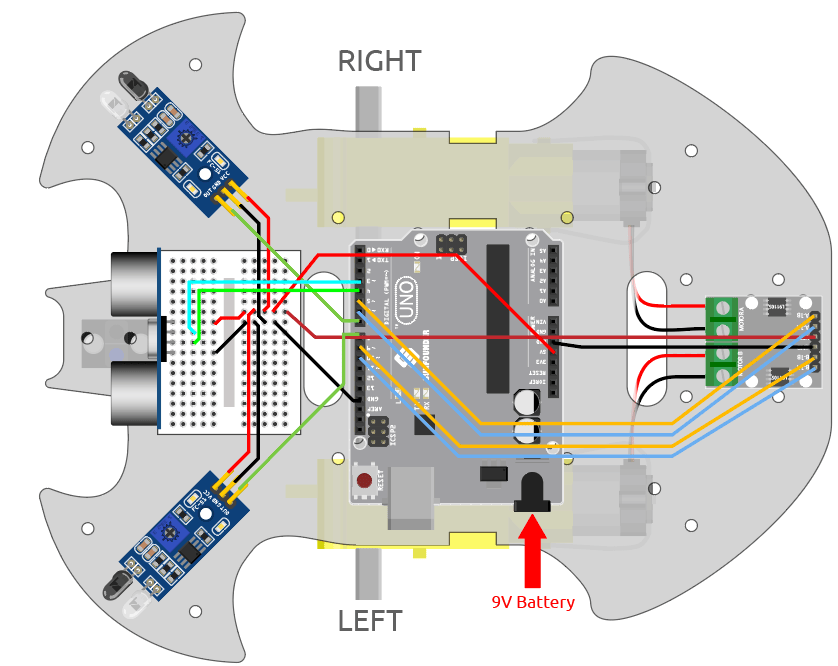
Schematics
Code
#include <Wire.h>
#include <LiquidCrystal_I2C.h>
#include "pitches.h"

// Motor pins
const int A_1B = 5;
const int A_1A = 6;
const int B_1B = 9;
const int B_1A = 10;

// IR sensors
const int rightIR = 7;
const int leftIR = 8;

// Ultrasonic sensor pins
const int trigPin = 3;
const int echoPin = 4;

// Buzzer pin
const int buzzerPin = 11;

// LCD setup (address may need to be changed to 0x3F if 0x27 doesn't work)
LiquidCrystal_I2C lcd(0x27, 16, 2);

// Melody data
int melody[] = {
  NOTE_A4, REST, NOTE_B4, REST, NOTE_C5, REST, NOTE_A4, REST,
  NOTE_D5, REST, NOTE_E5, REST, NOTE_D5, REST,
  NOTE_G4, NOTE_A4, NOTE_C5, NOTE_A4, NOTE_E5, NOTE_E5, REST,
  NOTE_D5, REST,
  NOTE_G4, NOTE_A4, NOTE_C5, NOTE_A4, NOTE_D5, NOTE_D5, REST,
  NOTE_C5, REST, NOTE_B4, NOTE_A4, REST,
  NOTE_G4, NOTE_A4, NOTE_C5, NOTE_A4, NOTE_C5, NOTE_D5, REST,
  NOTE_B4, NOTE_A4, NOTE_G4, REST, NOTE_G4, REST, NOTE_D5, REST, NOTE_C5, REST,
  NOTE_G4, NOTE_A4, NOTE_C5, NOTE_A4, NOTE_E5, NOTE_E5, REST,
  NOTE_D5, REST,
  NOTE_G4, NOTE_A4, NOTE_C5, NOTE_A4, NOTE_G5, NOTE_B4, REST,
  NOTE_C5, REST, NOTE_B4, NOTE_A4, REST,
  NOTE_G4, NOTE_A4, NOTE_C5, NOTE_A4, NOTE_C5, NOTE_D5, REST,
  NOTE_B4, NOTE_A4, NOTE_G4, REST, NOTE_G4, REST, NOTE_D5, REST, NOTE_C5, REST,
  NOTE_C5, REST, NOTE_D5, REST, NOTE_G4, REST, NOTE_D5, REST, NOTE_E5, REST,
  NOTE_G5, NOTE_F5, NOTE_E5, REST,
  NOTE_C5, REST, NOTE_D5, REST, NOTE_G4, REST
};

int durations[] = {
  8, 8, 8, 8, 8, 8, 8, 4,
  8, 8, 8, 8, 2, 2,
  8, 8, 8, 8, 2, 8, 8,
  2, 8,
  8, 8, 8, 8, 2, 8, 8,
  4, 8, 8, 8, 8,
  8, 8, 8, 8, 2, 8, 8,
  2, 8, 4, 8, 8, 8, 8, 8, 1, 4,
  8, 8, 8, 8, 2, 8, 8,
  2, 8,
  8, 8, 8, 8, 2, 8, 8,
  2, 8, 8, 8, 8,
  8, 8, 8, 8, 2, 8, 8,
  4, 8, 3, 8, 8, 8, 8, 8, 1, 4,
  2, 6, 2, 6, 4, 4, 2, 6, 2, 3,
  8, 8, 8, 8,
  2, 6, 2, 6, 2, 1
};

// Variables to manage melody timing
int currentNote = 0;
unsigned long noteStartTime = 0;
int noteDuration = 0;

void setup() {
  Serial.begin(9600);

  // Motor pins
  pinMode(A_1B, OUTPUT);
  pinMode(A_1A, OUTPUT);
  pinMode(B_1B, OUTPUT);
  pinMode(B_1A, OUTPUT);

  // IR sensors
  pinMode(leftIR, INPUT);
  pinMode(rightIR, INPUT);

  // Ultrasonic sensor
  pinMode(echoPin, INPUT);
  pinMode(trigPin, OUTPUT);

  // Buzzer
  pinMode(buzzerPin, OUTPUT);

  // LCD init
  lcd.init();
  lcd.backlight();
  lcd.clear();
  lcd.setCursor(0, 0);
  lcd.print("Robot Starting");
  delay(1000);
  lcd.clear();
}

void loop() {
  float distance = readSensorData();

  int left = digitalRead(leftIR);   // 0: Obstructed, 1: Clear
  int right = digitalRead(rightIR);

  int speed = 150;

  // Display distance on first line
  lcd.setCursor(0, 0);
  lcd.print("Dist:");
  if (distance > 0) {
    lcd.print(distance, 1);
    lcd.print(" cm   "); // spaces clear leftovers
  } else {
    lcd.print("N/A    ");
  }

  // Movement and status logic
  if (distance > 5 && distance < 15) {
    moveForward(speed);
    lcd.setCursor(0, 1);
    lcd.print("Moving Forward   ");
  } else if (distance > 0 && distance <= 5) {
    stopMove();
    lcd.setCursor(0, 1);
    lcd.print("Too Close: Stop  ");
  } else {
    if (!left && right) {
      turnLeft(speed);
      lcd.setCursor(0, 1);
      lcd.print("Turning Left    ");
    } else if (left && !right) {
      turnRight(speed);
      lcd.setCursor(0, 1);
      lcd.print("Turning Right   ");
    } else {
      stopMove();
      lcd.setCursor(0, 1);
      lcd.print("Stopped         ");
    }
  }

  // Serial debug
  Serial.print("Distance: ");
  Serial.print(distance);
  Serial.print(" cm, Left IR: ");
  Serial.print(left);
  Serial.print(", Right IR: ");
  Serial.println(right);

  // Play melody non-blocking
  playMelodyNonBlocking();

  delay(50);
}

float readSensorData() {
  digitalWrite(trigPin, LOW);
  delayMicroseconds(2);
  digitalWrite(trigPin, HIGH);
  delayMicroseconds(10);
  digitalWrite(trigPin, LOW);

  long duration = pulseIn(echoPin, HIGH, 30000);  // 30ms timeout

  if (duration == 0) {
    return -1.0;
  } else {
    float distance = duration / 58.0;
    return distance;
  }
}

void moveForward(int speed) {
  analogWrite(A_1B, 0);
  analogWrite(A_1A, speed);
  analogWrite(B_1B, speed);
  analogWrite(B_1A, 0);
}

void moveBackward(int speed) {
  analogWrite(A_1B, speed);
  analogWrite(A_1A, 0);
  analogWrite(B_1B, 0);
  analogWrite(B_1A, speed);
}

void turnLeft(int speed) {
  int slowSpeed = speed / 2;  // slow down one motor to half speed
  analogWrite(A_1B, 0);
  analogWrite(A_1A, speed);   // full speed on left motor forward
  analogWrite(B_1B, 0);
  analogWrite(B_1A, slowSpeed); // half speed on right motor forward
}

void turnRight(int speed) {
  int slowSpeed = speed / 2;  // slow down one motor to half speed
  analogWrite(A_1B, slowSpeed); // half speed on left motor backward
  analogWrite(A_1A, 0);
  analogWrite(B_1B, speed);   // full speed on right motor backward
  analogWrite(B_1A, 0);
}


void stopMove() {
  analogWrite(A_1B, 0);
  analogWrite(A_1A, 0);
  analogWrite(B_1B, 0);
  analogWrite(B_1A, 0);
}

// Non-blocking melody player function
void playMelodyNonBlocking() {
  unsigned long currentTime = millis();

  if (currentNote >= (sizeof(durations) / sizeof(int))) {
    currentNote = 0;  // Restart melody after finishing
  }

  if (noteStartTime == 0 || currentTime - noteStartTime >= noteDuration) {
    // Stop previous note
    noTone(buzzerPin);

    // Calculate duration of this note
    noteDuration = 1000 / durations[currentNote];

    if (melody[currentNote] == REST) {
      // Rest: no tone, just delay
      noTone(buzzerPin);
    } else {
      tone(buzzerPin, melody[currentNote], noteDuration);
    }

    noteStartTime = currentTime;
    currentNote++;
  }
}
Bill of Materials
| Part | Note | Price | Link |
|---|---|---|---|
| SunFounder 3 in 1 IoT/Smart Car/Learning Kit | Foundation of Robot | $59.99 | Link |
Other Resources/Examples
Here are the following tutorials that assisted me in building my project.